
Exterior Repairs
For years, my developer friend, Eric, tried to convince me to buy a fixer-upper and oversee the work myself—yet I felt very intimidated by the idea. In 2018, I summoned up the courage and purchased a 1930s Craftsman. It wasn’t a fixer-upper but did need some love and attention. During the purchase, the inspector discovered a few issues with the house. It was built in 1930 after all.
The first problem to address was the sagging roofline next to the side porch. The roofer who initially gave me an estimate said that it could have been due to a previous leak even though there was no sign of a leak inside. However, we were in for a surprise. Once the roofers removed the shingles, they found a big gaping hole and saw that the eave had never been tied into the existing house’s structure. It was put up without the support of the house and thus was sagging! This suddenly was not a small repair but more extensive and costly because the eave needed to be tied into the roof all the way up.
After the roofers were done, I noticed that the rafter tails still looked bad in the once sagging area. They told me that they only repair roofs—they do not repair anything else. So I had my ever trusty handy-woman, Tanya, finish the repair job.


Another issue the inspector pointed out was that there were holes in the stone. He said that the holes were large enough for small animals to burrow into which would cause them to get bigger and bigger compromising the integrity of the stone. I hired a masonry guy to come and patch all the holes and any additional spots that needed repair. I also had him remove the old coal shoot entrance into the basement in case it leaked and he covered the hole with matching stone. By looking at the house, you’d never guess where it once was.
The Before
From a distance, the stone on the house didn’t look too bad. But once you got up close, it was a mess! It had different color mortar repairs, the holes that had been newly patched, paint splashes, and years of age and wear. The backside of the house had a bad mashup of yellow stone, red brick, brown siding, old shingles, and concrete blocks.


Paint Color
When it came to picking a house color, I wanted to pick a color that helped my house stand out amongst the two larger houses on either side. I loved the new white houses I was starting to see. I was on the beginning of this trend and didn’t realize how much of a trend it would be! Since I painted my house, the house across the street, the house two doors down, and two houses further down on the street have all been painted white. If I had known how popular this trend would be, I might have chosen a different color, but overall I’m really happy with how it looks.
Spending thousands of dollars on 20 gallons of paint, three gallons of stain, and the labor for the paint job, I had to know that I was going to like the color or color combinations I chose! So with my skills as a graphic designer, I mocked up in Photoshop the paint color options I liked. When it came to trimming out the house, I wanted to trim it out in black but when I saw it mocked up, I thought it might make the house look smaller — and it’s already dwarfed by larger houses on either side. So in the end, at the recommendation of my friend, Kevin (who has great taste), I decided to just paint the whole house white. I also wanted to wrap the columns in wood and stain them to match the cedar shakes. Then stain the doors, stain the wood across the top, and build new window boxes and stain them (represented in the third picture below). Due to the cost and time of buying new wood, staining, and installation, I ended up going with an easier and cheaper option which was to paint the doors and window boxes which I could do myself.

When the painters started staining the cedar shakes the dark stain color I had chosen, the stain looked like it was a perfect match to the roof shingle color which I wasn’t expecting. I panicked. They were in the process of spraying the stain so it was too late to switch stain colors and yet — what could be done?— I didn’t want to hate it. Thankfully, the painter had the idea to towel off some of the stain and go with a lighter spray stroke which gave it a bit of difference in shade. My realtor and long-time friend, Linnae, came over to give me a hug and her opinion that the stain color was going to be ok. Sometimes you need someone to “hold your hand” during a stressful process and affirm that the decisions you are making are good ones. Thankfully my friends have been a great support!

Once the house was professionally painted, I had to paint the front railing, and add new house numbers, and my friend, James, helped me drill into the stone to install a new mailbox. The outside lights at the front and side door did not match, so I searched and searched online to find a matching light. Eventually, I did. The new light was shiny black and the old light was faded, so I spray painted the old one black to match the new one. Later Eric helped me by rebuilding my window boxes—replacing the bottoms that were rotted out.
It took me three tries to get the light green accent color just right for the doors and window boxes. The first try was too 1950’s appliance blue, the second try was too green. The third try was the charm! ZEN-PPU11-14 (This was the only time that I forgot my paint chips when I went to the store and I now know it’s worth driving all the way back home to get them instead of guessing on the paint color.)
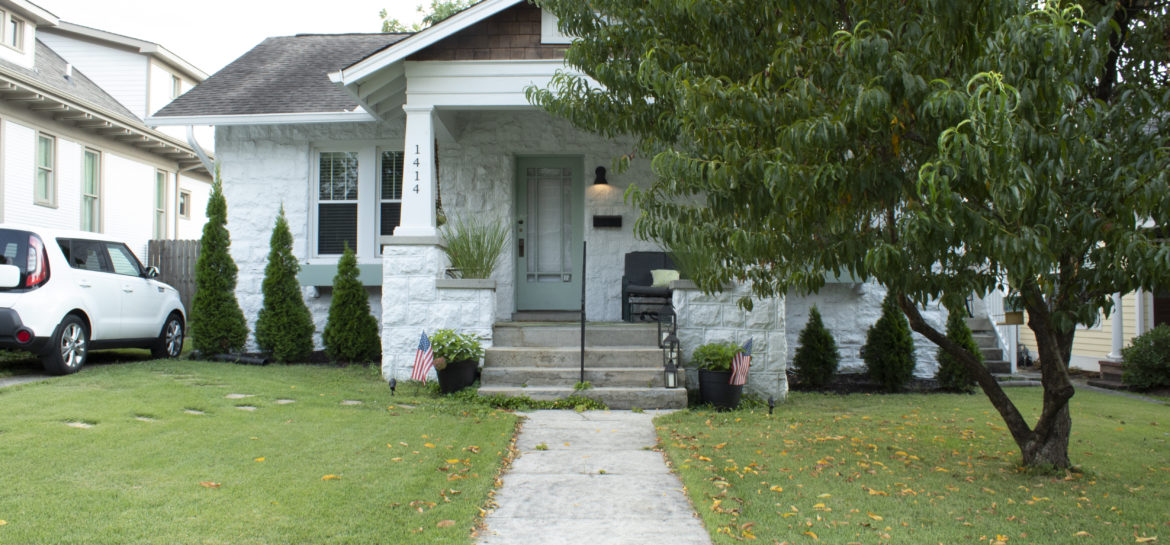
The After
A coat of paint really transformed the look of this house.


You’ll notice the power of pressure washing! Washing the steps, sidewalk, and back patio clean made a huge difference! What I love about the back of the house now is that it is all one color. No longer do you notice all the different textures and electrical boxes.


.


This is how sweet my house looks covered in snow.

Looks fantastic Linda! It’s so much fun (after the stress of course) to make a house your own.
I have enjoyed the process. I love to figure out what I want, plan it out, and then make it happen.
You’re amazing and your home reflects exactly that. AMAZING!
Great job!
You make it look easy!